 Version
Select which version of the calendar you have
- Desktop Calendar 7
- Desktop Calendar 0.5
- Desktop Calendar 0.4
- FAQ
- Walkthrough
- Tips
- Hotkeys
 Contact
Can't find the answer to your question here? Contact us.
Desktop Calendar 0.4 FAQ
Can I make the calendar bigger?
The default Square Box style (see "Changing the Box Style" below") is the largest this version of the calendar can get. In the upgrade there is an "Extra Large Cells" option which is around twice the size of the square box style.
Changing the Box Style
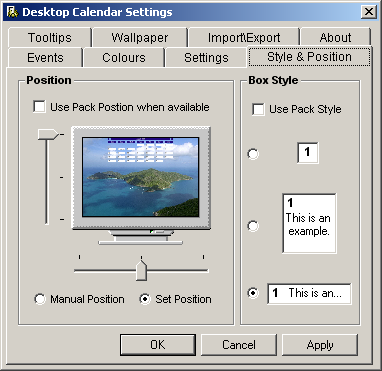
Go into the settings and click on the "Style & Position" tab. Make sure "Use Pack Style" is not selected, then choose which box style you want by clicking the radio button next to it. When you're done, click on "OK" for the changes to take effect.

Alternatively you can quickly change between the box styles using hotkeys. Make sure the calendar is selected (this can be done just by clicking on it somewhere), then press the F9 key. This will cycle through each box style in turn, Square -> Mini -> Thin.
Positioning the Calendar
There are two ways to position the calendar, either in the Settings by selecting a quadrant of the screen, or manually by dragging the calendar where you want it. There are a couple of advantages of setting the position over manually dragging it. Firstly if you drag the calendar to the far right or bottom of your screen, then change down to a smaller resolution then there's a chance your calendar will no longer be visible! But when you set the position, the calendar will always reposition it's self when the dimensions of the screen are altered e.g. if the resolution is changed or the start bar is moved. Also if you position the calendar at the bottom of the screen and you go into compact mode then the title bar will jump down out the way. If you to do the same thing with manual positioning, the title bar will just hover in the middle of the screen.
To set the position of the calendar, go into the settings and click on the "Style & Position" tab (see screenshot above). Make sure that "Use Pack Position when available" is not checked and the "Set Position" radio button is selected. Now you can use the vertical and horizontal slide bars to place the calendar where you want it. When you're done, click "OK" for the changes to be applied.
To manually position the calendar, you first need to turn on Manual Positioning. Go into the settings and click on the "Style & Position" tab (see screenshot above). Make sure that "Use Pack Position when available" is not checked. Then select the "Manual Positioning" radio button and click on "OK". Now you can hold down your left mouse button while over the Title Bar and drag the calendar around the screen. When your happy with the positioning, release the mouse button.
Can the Calendar be made Translucent?
No.
What's Compact Mode?
Compact mode is when all of the calendar is hidden except for the Title Bar. This can be useful for getting the calendar out the way when your not using it and allows you to see more of your wallpaper.

You can put the calendar into compact mode by double clicking on the title bar. Then when you want it back, simple double click again and the calendar should be restored.
Alternatively you can select "Switch into Compact Mode when not in use" in the settings windows on the "Settings" tab. This means if your mouse hasn't moved over the calendar in set time, it automatically puts its self into compact mode. When your mouse next moves over the compacted Title Bar, the calendar will pop open again ready for use.
Can I Change the Fonts used?
No.
How do I Change the Date Format or Show the Time?
Go into the settings and click on the "Settings" tab.
You can select the date format you want with the drop down box on the right. You will see a preview of what the title bar will look like in the box above.
To show the time in the title bar as well then tick box next to "Time" and select the format you want from the left drop down box. Again you can see what it'll look like in the preview above.
Transparent Icon Backs
This tries to make the back of your desktop icons transparent when running Windows 98, 2000 or NT (Windows XP does it anyway). If you're still unsure what this means take a look at the example picture below. Note: This may not work on some machines and can sometimes conflict with the "Use System Colours" option.
To turn the feature on, go into the settings and click on the "Settings" tab. Now place a tick in the "Make Icon Backs Transparent" option. You'll be asked to confirm the action, click "Yes". Then close the settings window by clicking on "OK". You may need you restart your computer for the changes to take effect.

